Everybody loves videos because you can consume a lot of information in a very short time. So rather than reading a long blog post, many visitors prefer to go through a video.
Consider this: Adults in the US spend almost 100 minutes a day watching online videos.
Given this interest in how we prefer to consume content, many WordPress site owners embed a video in blog posts. This caters to readers and to all of you who prefer watching over reading.
Adding videos to your posts and pages makes them more “sticky.”
As a result, the overall bounce rate drops, and the visitors’ stay-time increases.
Adding video also benefits the search engine rankings of your website and adds to the brand’s reputation.
We tried and tested every way we could think of to embed a video in WordPress. Some worked, some didn’t. What follows are the simplest, most effective ways to embed video.
WordPress Loves Video
WordPress powers almost 40% of all the websites on the internet today. Excellent support for video files and multiple easy options for embedding videos in posts and pages are two critical factors behind the success of WordPress.
The current version, WordPress 6.6, supports all popular video formats, including:
- mp4
- m4v
- webm
- ogv
- flv
As you can see from the list, you can create or record your videos in all popular formats and then embed them on your pages.
Living up to its reputation of offering multiple ways of doing things, WordPress, with custom WordPress development services, provides you with three ways to embed videos in WordPress.
However, as you’ll see, not all methods offer the same benefit. We urge you to try all the methods and choose the one that works for you.
To demonstrate these methods, we’ll show you how to embed a YouTube video in a WordPress post or page.
If your videos are hosted on another video hosting platform or on your server (more on that later in this post), these methods should work perfectly.
Method 1: Just Paste the Link (The oEmbed Method)
The WordPress Gutenberg block editor offers several video-specific blocks and video widget that simplify the process of embedding videos comparatively classic editor.
This auto-embed technique automatically retrieves all necessary details from the host and determines the optimal video alignment and method for displaying the video.
During the process, the Gutenberg editor can switch blocks to the one best suited for the link. For instance, if you paste a link from YouTube, it’ll automatically select the YouTube block to embed the link.
Using the auto-embed option is straightforward and takes just seconds to embed videos on your WordPress site into the desired location.
Here’s how you use this method.
Copy the Link to the Resource
Start by copying the link of the resource you wish to embed. Usually, the URL is in the address bar.

Paste the Link in the Editor
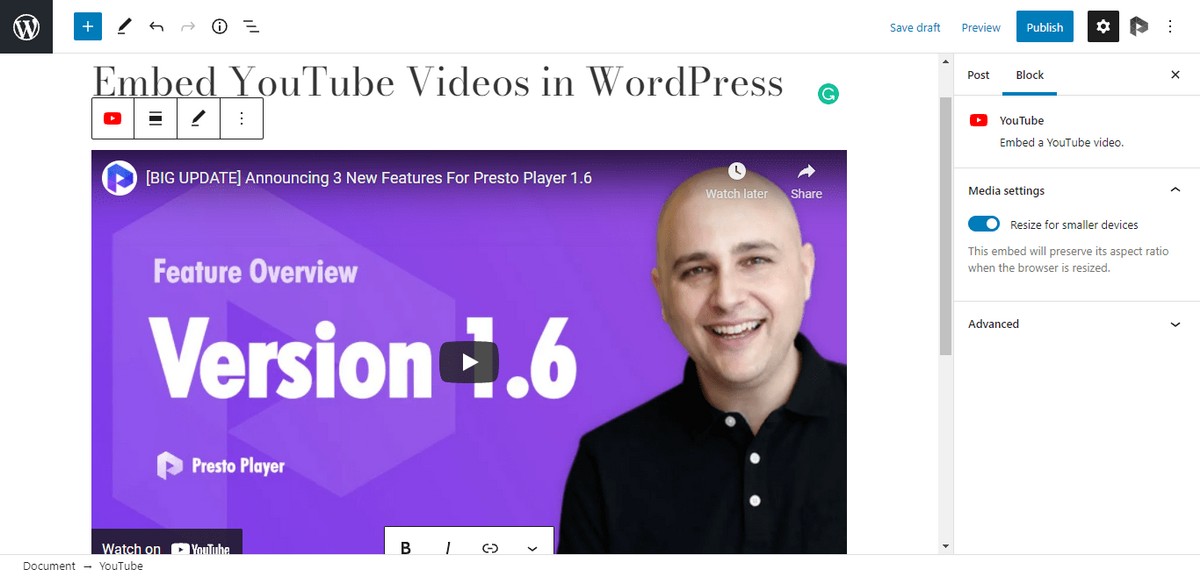
Simply paste the link into the WordPress editor. The visual editor will fetch the video and embed it at the location.
Preview and Publish
Next, check out the WordPress blog post preview to see how the responsive video on your site would appear.

Why oEmbed Method Isn’t a Good Idea
Auto-embed might seem the best way to embed a video – simply paste the URL of the video, and it appears automatically!
Well, that’s about it – there is no room for further customization, and you’ll have to be content with the default player offered by the video host.
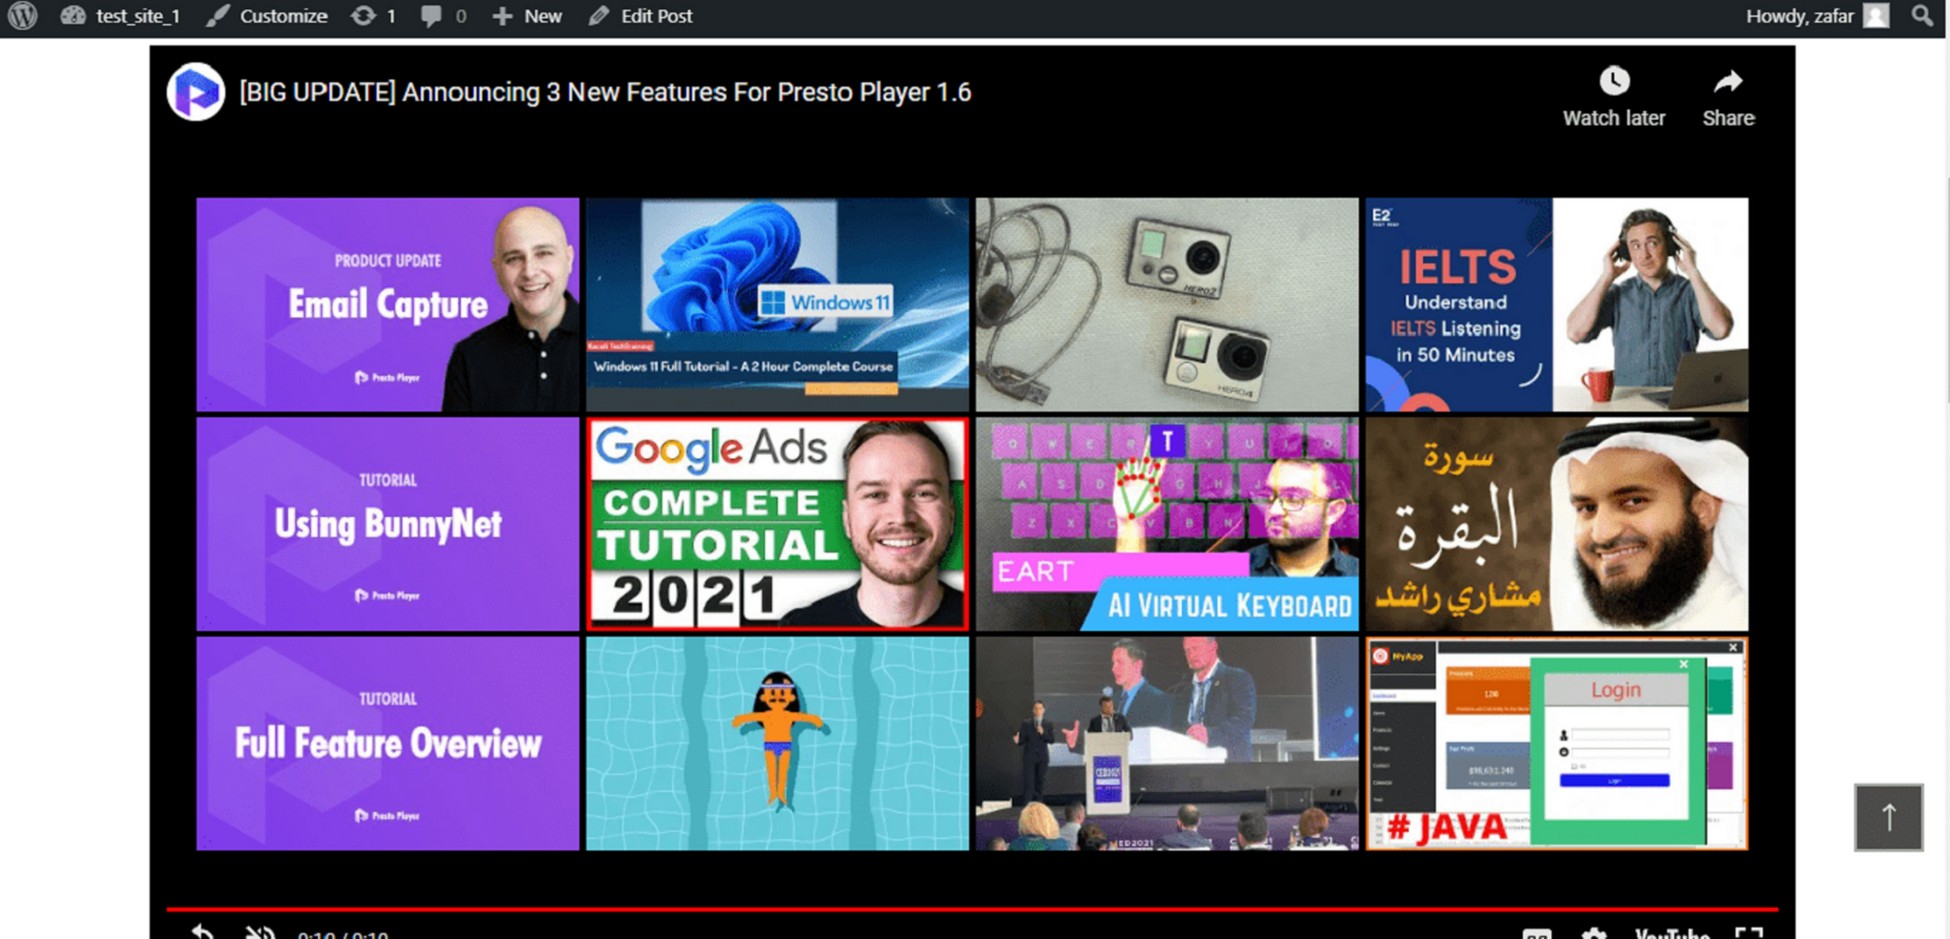
In the case of YouTube, you can see all the features of the YouTube player, particularly the Recommended Videos and Watch on YouTube button.
This means you have little to no control over how your YouTube-hosted videos would look and behave. Plus, those are two easy opportunities for visitors to disappear before watching your video content!
Method 2: Use an iFrame Embed
The iframe embed method takes advantage of the fact that video hosts often offer a better-looking way of embedding video in WordPress websites, the iFrame.
This method also involves copying from the video host and pasting it into the location where you wish to embed the video. However, this method offers much more than the simple oEmbed method.
For one, the method depends upon an HTML snippet that encloses all the required information in a <iframe> tag.
This tag essentially contains the basic information about how the player would play the video. In addition to the height and width of the player, this snippet also enables some of the core YouTube player features (such as the gyroscope option for changing the mode when the device is rotated).
While creating the snippet, you also have the choice of showing or hiding player controls and selecting a specific starting point for the video.
By setting these two additional options, you can slightly change the way the video is played on your pages.
Note that not all video hosts support this method or provide all the options mentioned above.
The iframe method is a three-step process.
Go to the Video Page
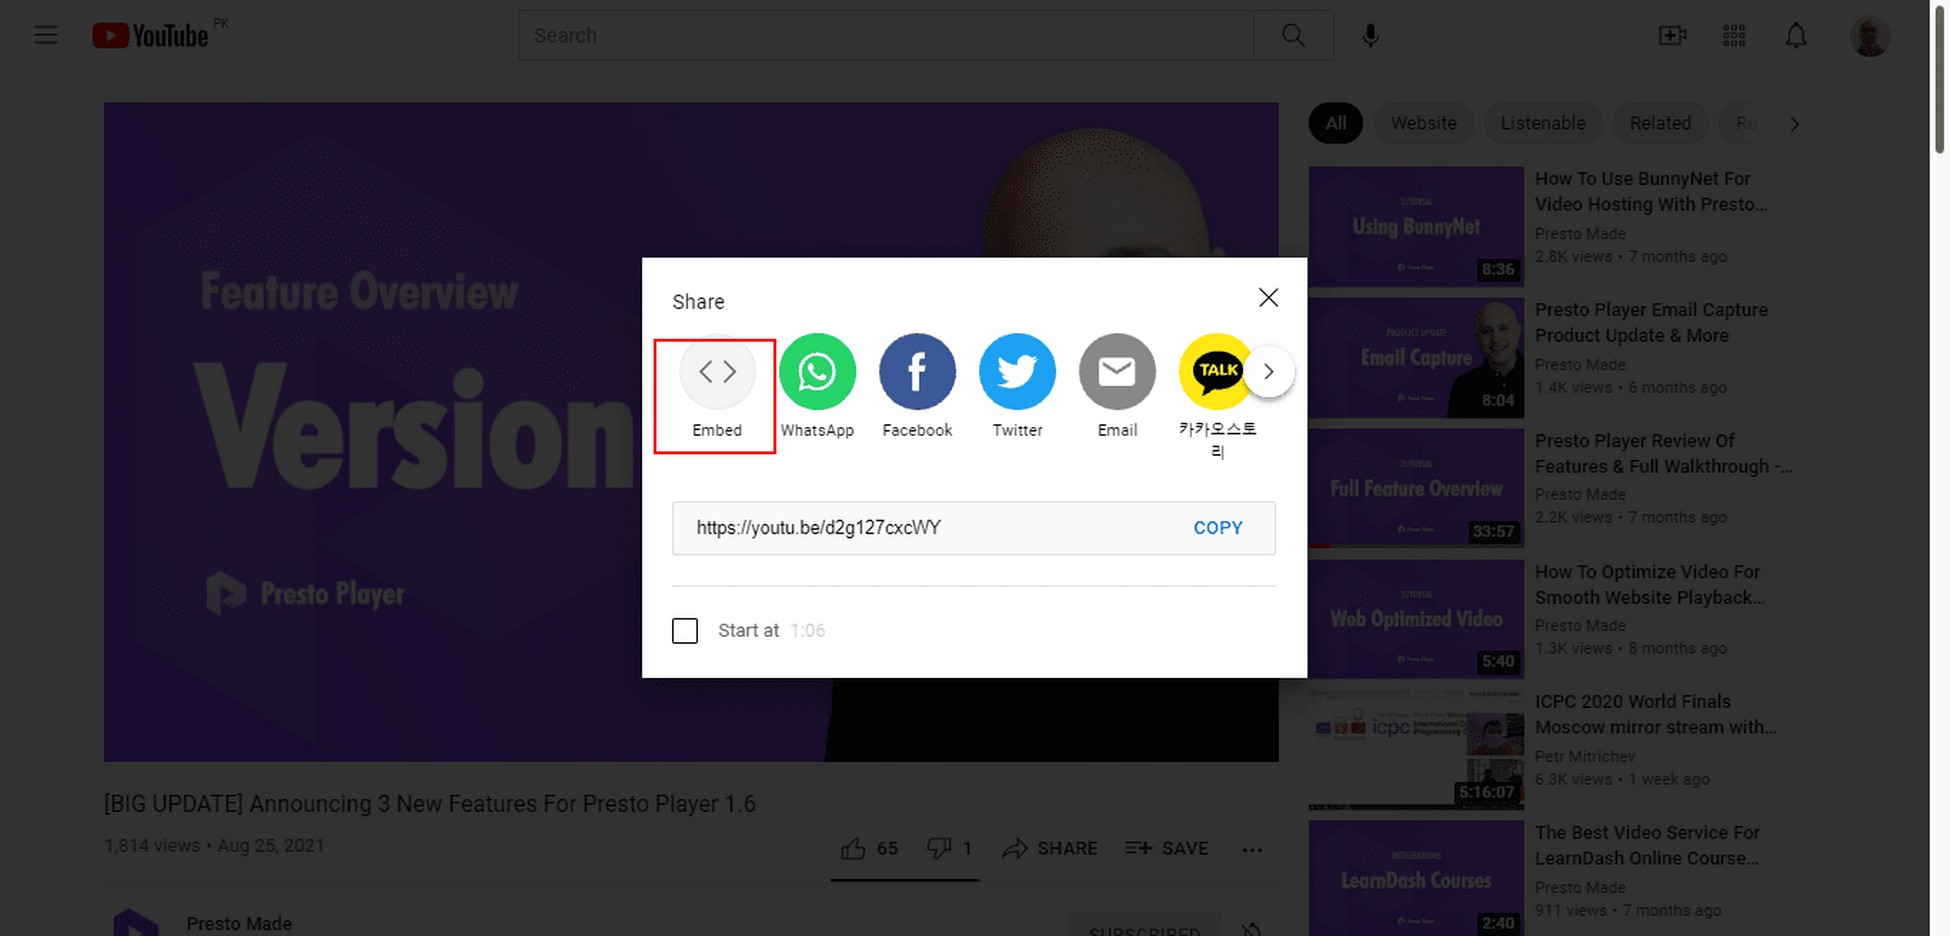
Check the video page to see whether there is a Share button or Embed option. Click it to go to the Embed option.
Format the iframe Tag
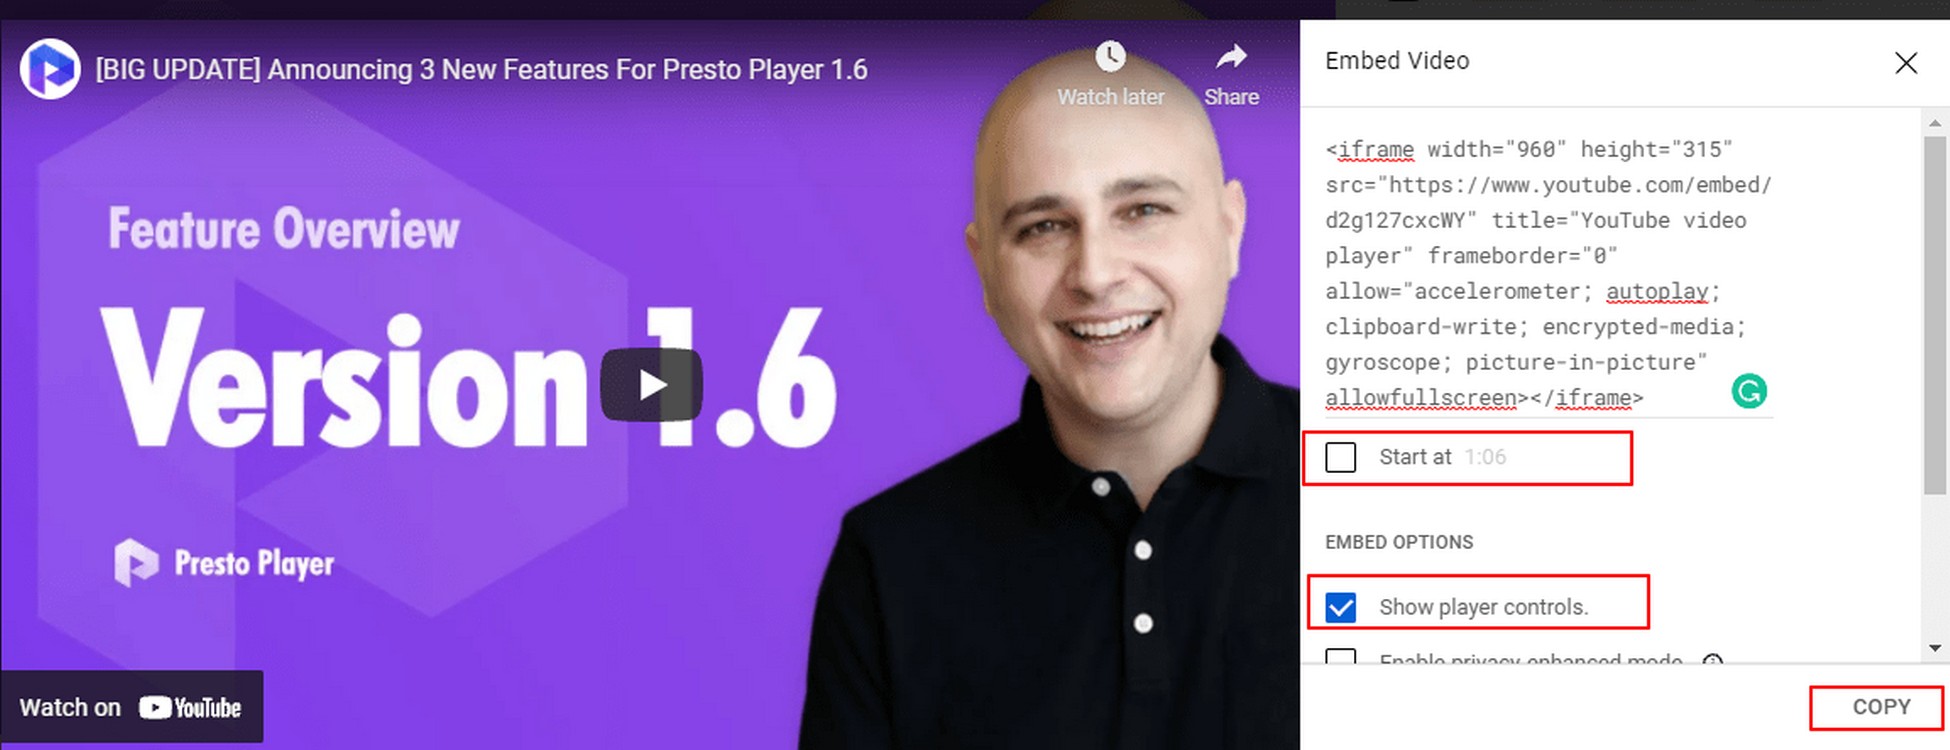
Carefully go through the available options to create the iframe tag.
An iFrame looks like this:
In the case of YouTube, the content of the iframe tag is already present in the menu. You can just click Copy at this point and move to the final step.
If you wish, you can explore other options in the popup menu.
By default, the video starts playing at the start (the 0:00 mark). You can alter the starting point of the video within those options. Similarly, you can choose to show or hide player controls to make sure that the video player fits into the general design of your website.
Paste the iFrame Code and Preview
Now open the WordPress page or post editor, select the embed block and you have the right iFrame code, simply copy it and paste it to the appropriate location.
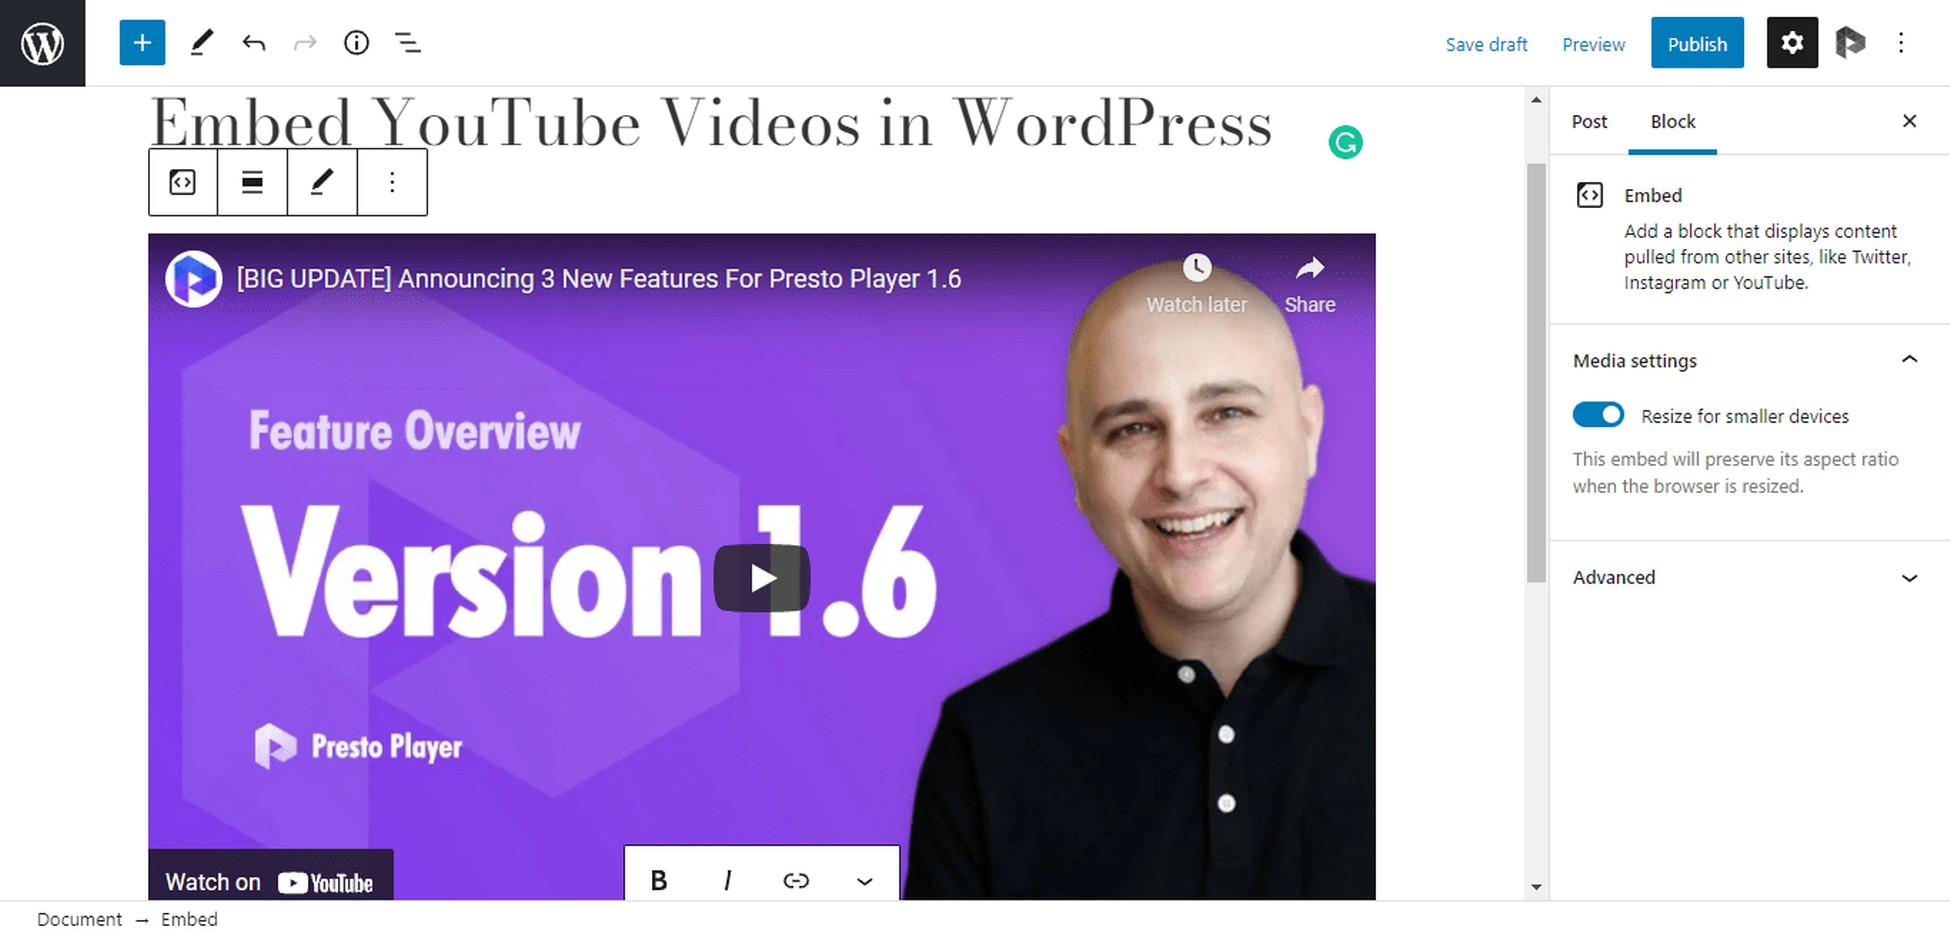
Preview the post to see if the video looks right.

The iframe method of embedding videos offers more versatility and better control over how the player would integrate into the website design. It also allows you to show or hide player controls, control the player’s dimensions, and make sure the video plays without a hitch.
However, that’s about the end of the list of the benefits to embed videos using the iFrame method!!
Stop and Think Why You Want To Embed Videos
For marketers, videos serve an important purpose. They are essential for getting the message across quickly and educating users on how to best interact with the topic being discussed.
So, before we move to the last, (and in our opinion, the best), way of embedding videos in your WordPress website, we would like to highlight an important drawback of these two methods.
The above methods lock you to a particular host and how you can use these methods depends largely on the host’s features.
This is not a good situation for WordPress website owners, as many of us often want to try out new ideas and products to optimize our workflows.
Let’s take YouTube’s example.
Here, you opt for YouTube as your video hosting service (not a bad idea in itself). Now, when you use the above two methods, you’ll be restricted to the default YouTube player.
YouTube also shows ads in between and at the end of each video and inserts recommendations at the end of each video.
This lack of control is never a good option. Fortunately, the last method to embed videos in WordPress aims to rectify this.
Method 3: Use Presto Player to Embed Videos
This method uses Presto Player, one of the versatile WordPress video player plugins that takes care of all your video embedding needs. As the name suggests, Presto Player doubles as a highly customizable player that fits seamlessly into your website design.
Here’s how you can easily embed a video into your web pages using Presto Player.
To keep this example consistent, we’ll show you how to embed a YouTube video in a webpage using Presto Player.
Copy the Link to the Resource
Simply copy the YouTube video URL.

Add a Presto Player YouTube Block
Presto Player comes with dedicated blocks for popular video hosts such as YouTube and Vimeo.
Since this is a YouTube video, use the Presto Player YouTube Video block to access all the optimizations that the WordPress plugin offers for embedding and displaying YouTube videos.
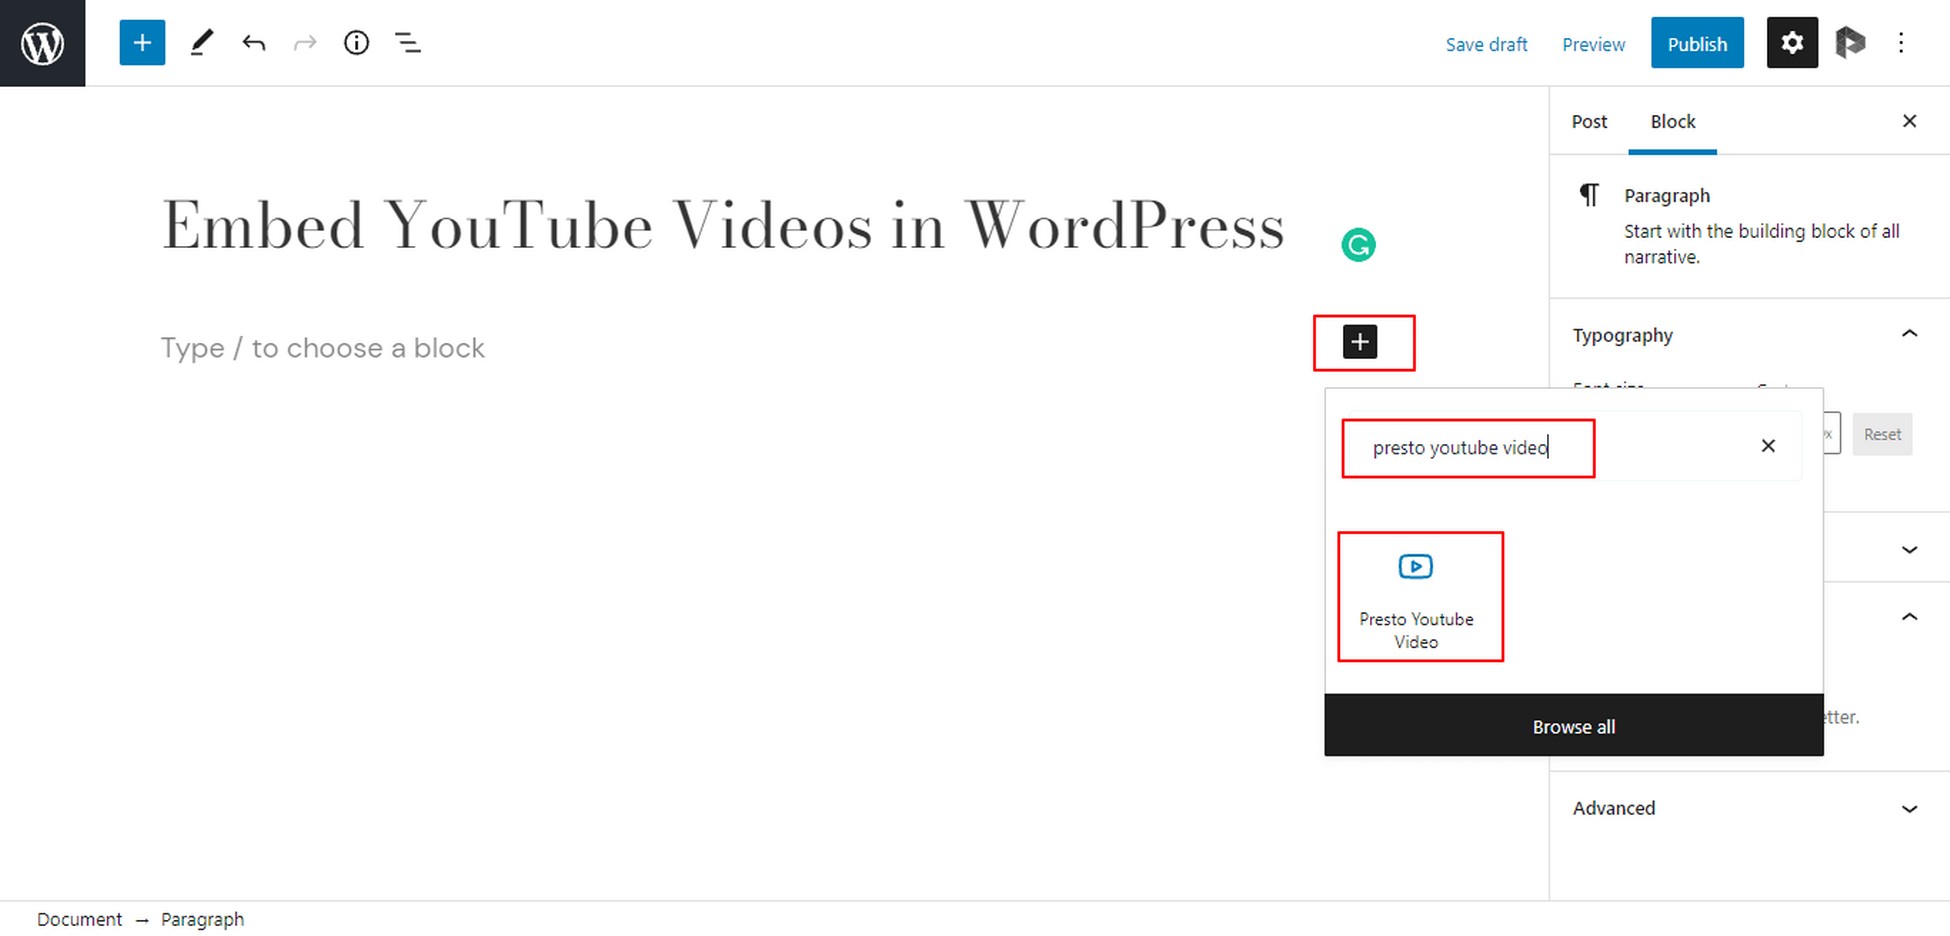
Search for Presto Player YouTube Video and click it to add the block type to the post.
Add the Video URL
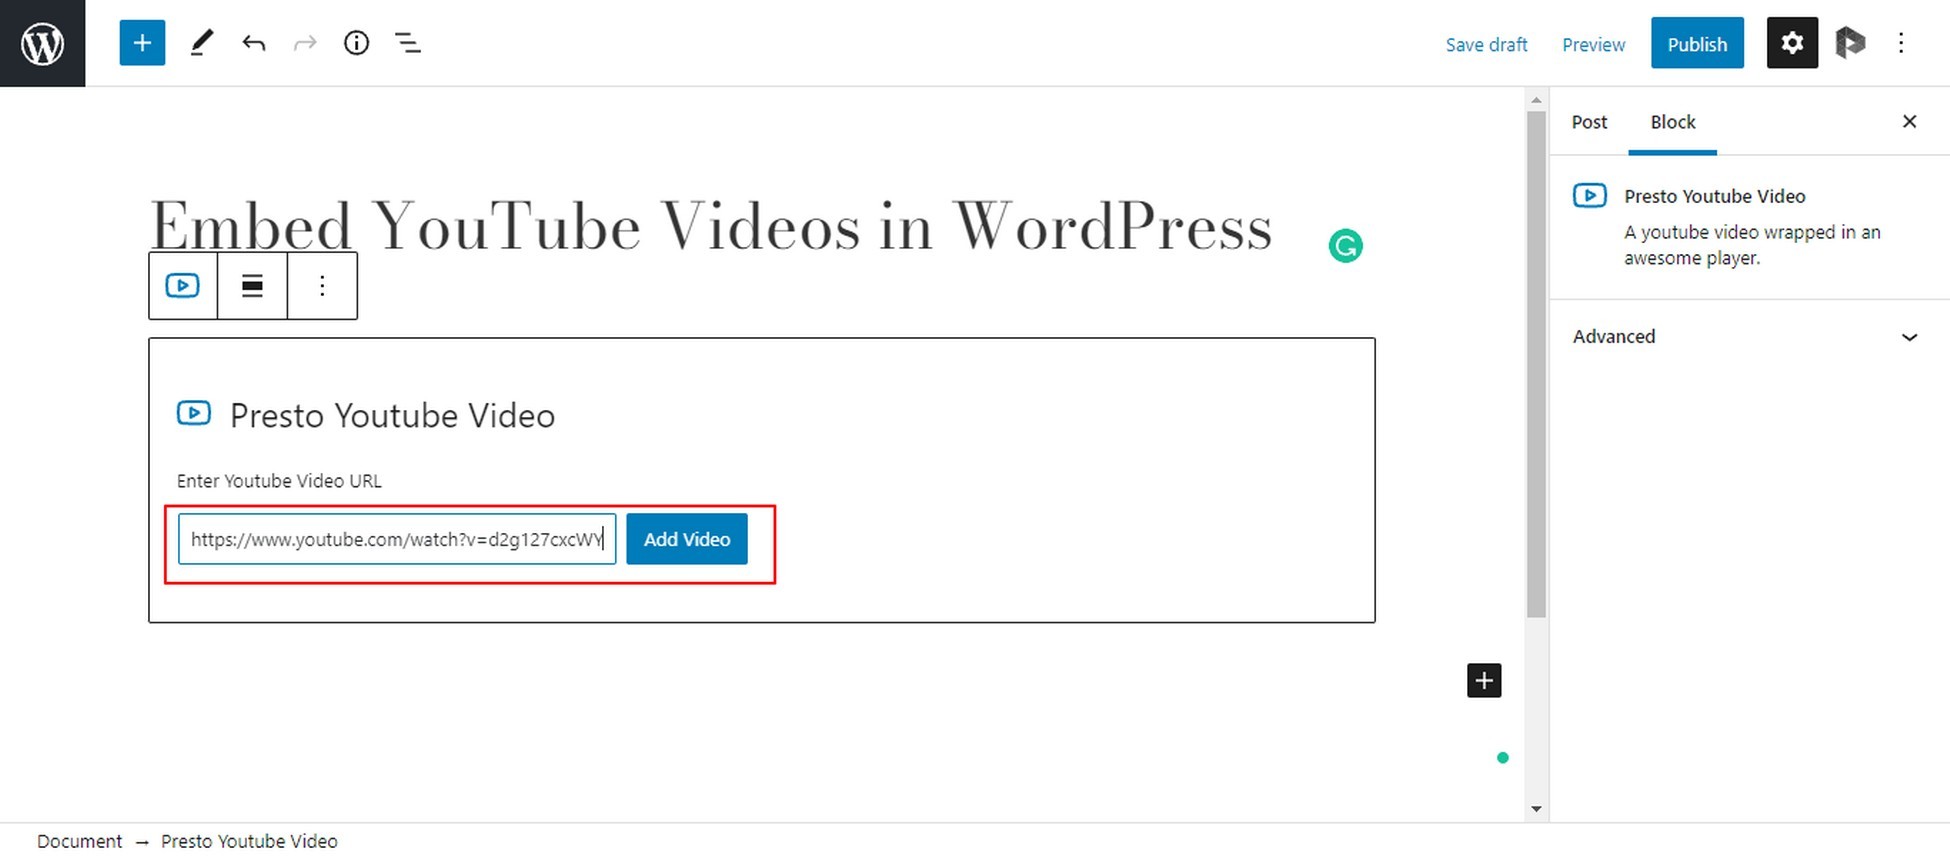
Simply paste the video link and click the Add Video button. Presto Player will fetch the video and embed it at the location of the block.
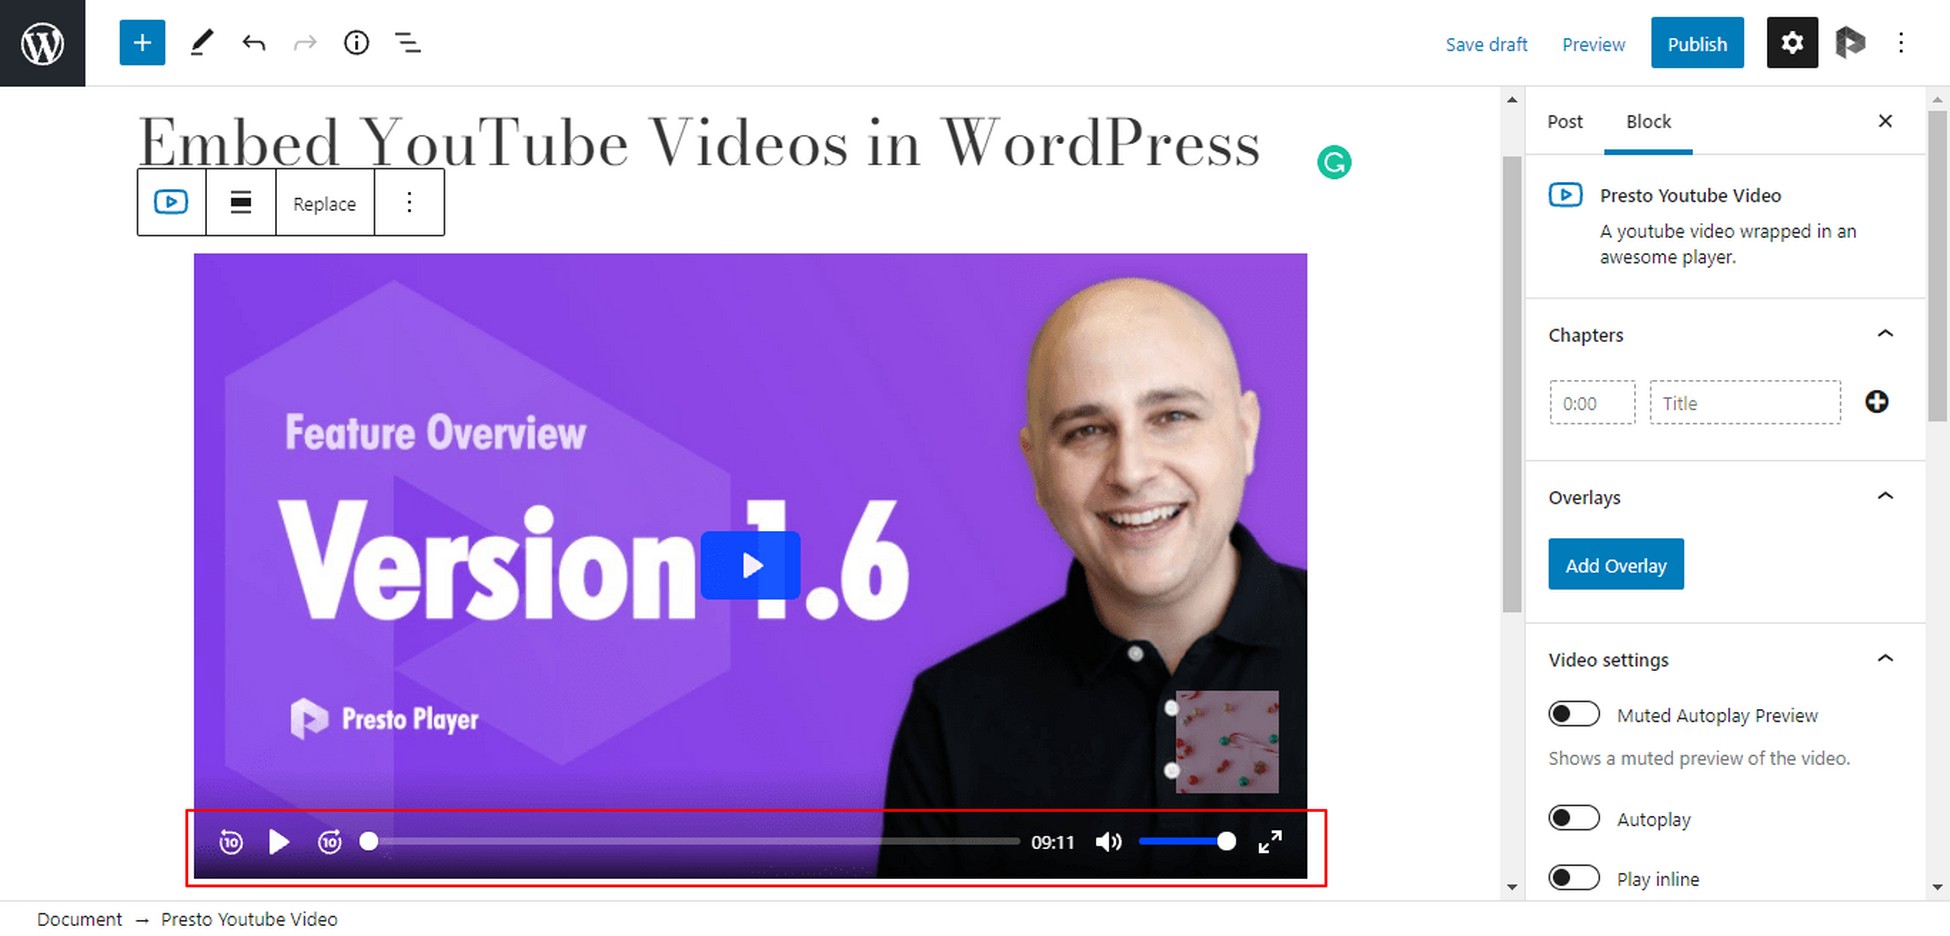
This is where you can experience the real benefit of this method.
Unlike the other two methods that confine you to the default YouTube player, Presto Player embeds a clean-looking player that can be fully customized with presets and overlays.
Apply the YouTube Optimized Preset
At this point, the video is embedded, and you can publish the video by hitting the Publish button.
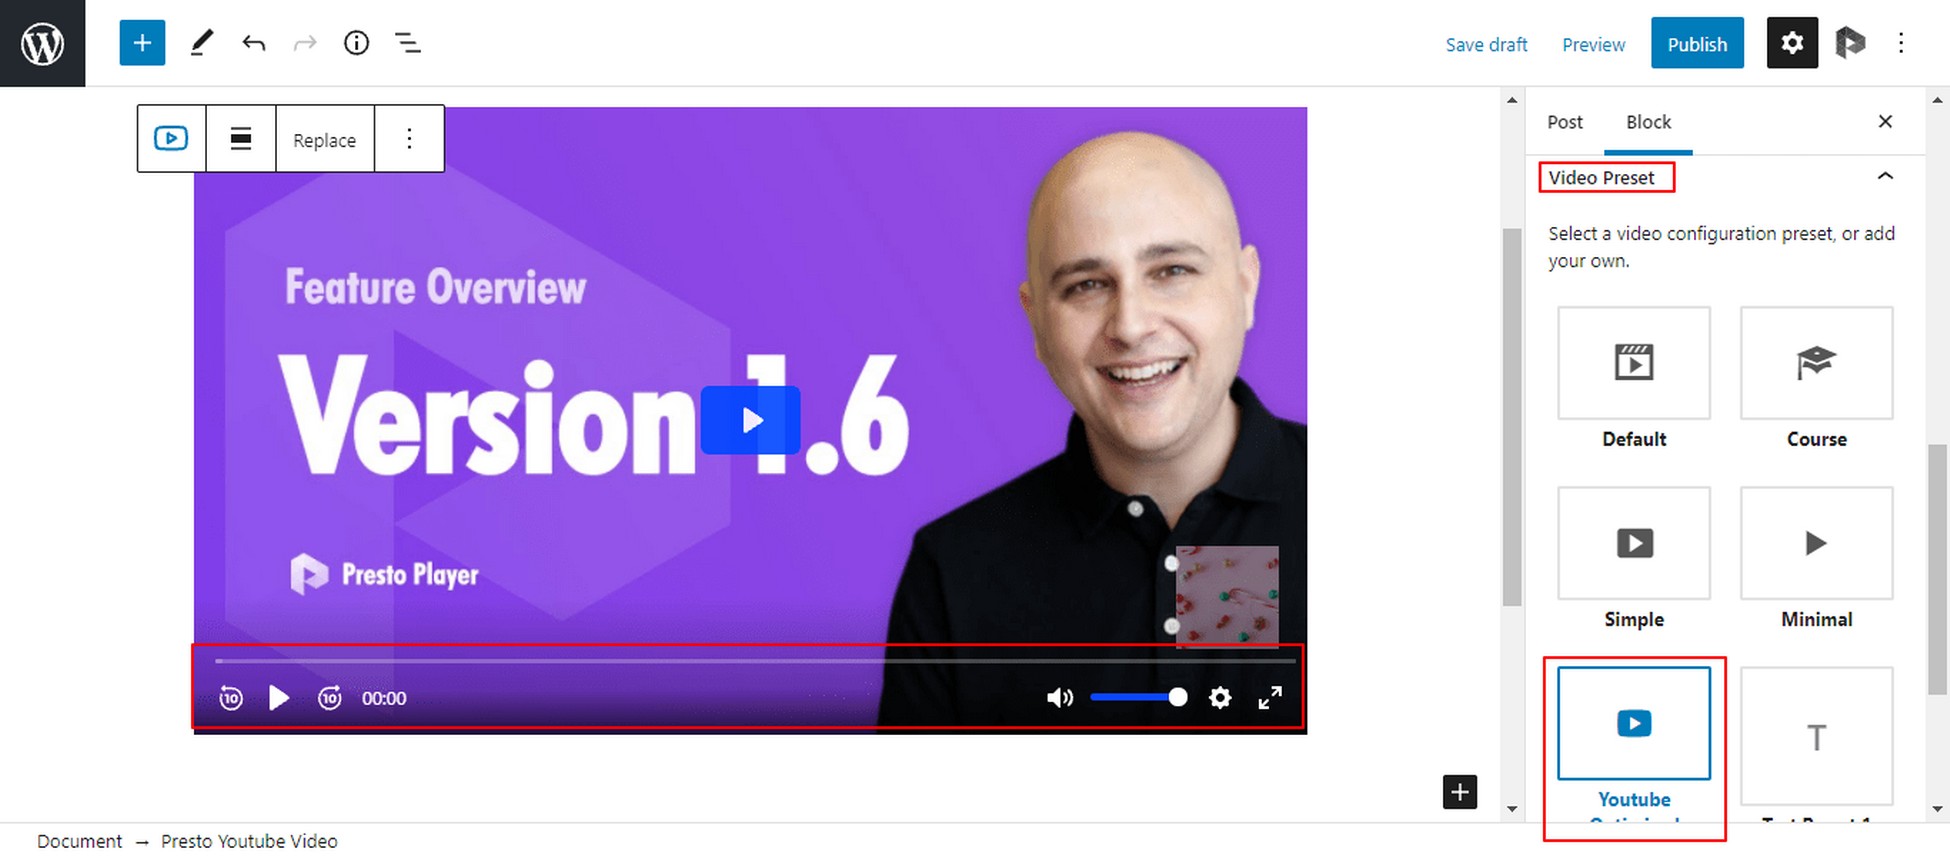
However, if you wish to benefit from Presto Player advanced capabilities, go to the sidebar with the block’s properties.
Scroll down to the Video Preset section and select the YouTube Optimized preset to apply a predefined set of optimizations that change the video’s look and feel.
Method 4: Display Videos in a Searchable Table
Method 4 is a bonus method because it works with methods 1, 2 and 3.
If you just want to embed a few videos in WordPress then it’s fine to add them straight to the page. However, this quickly becomes disorganized if you’re embedding lots of videos.
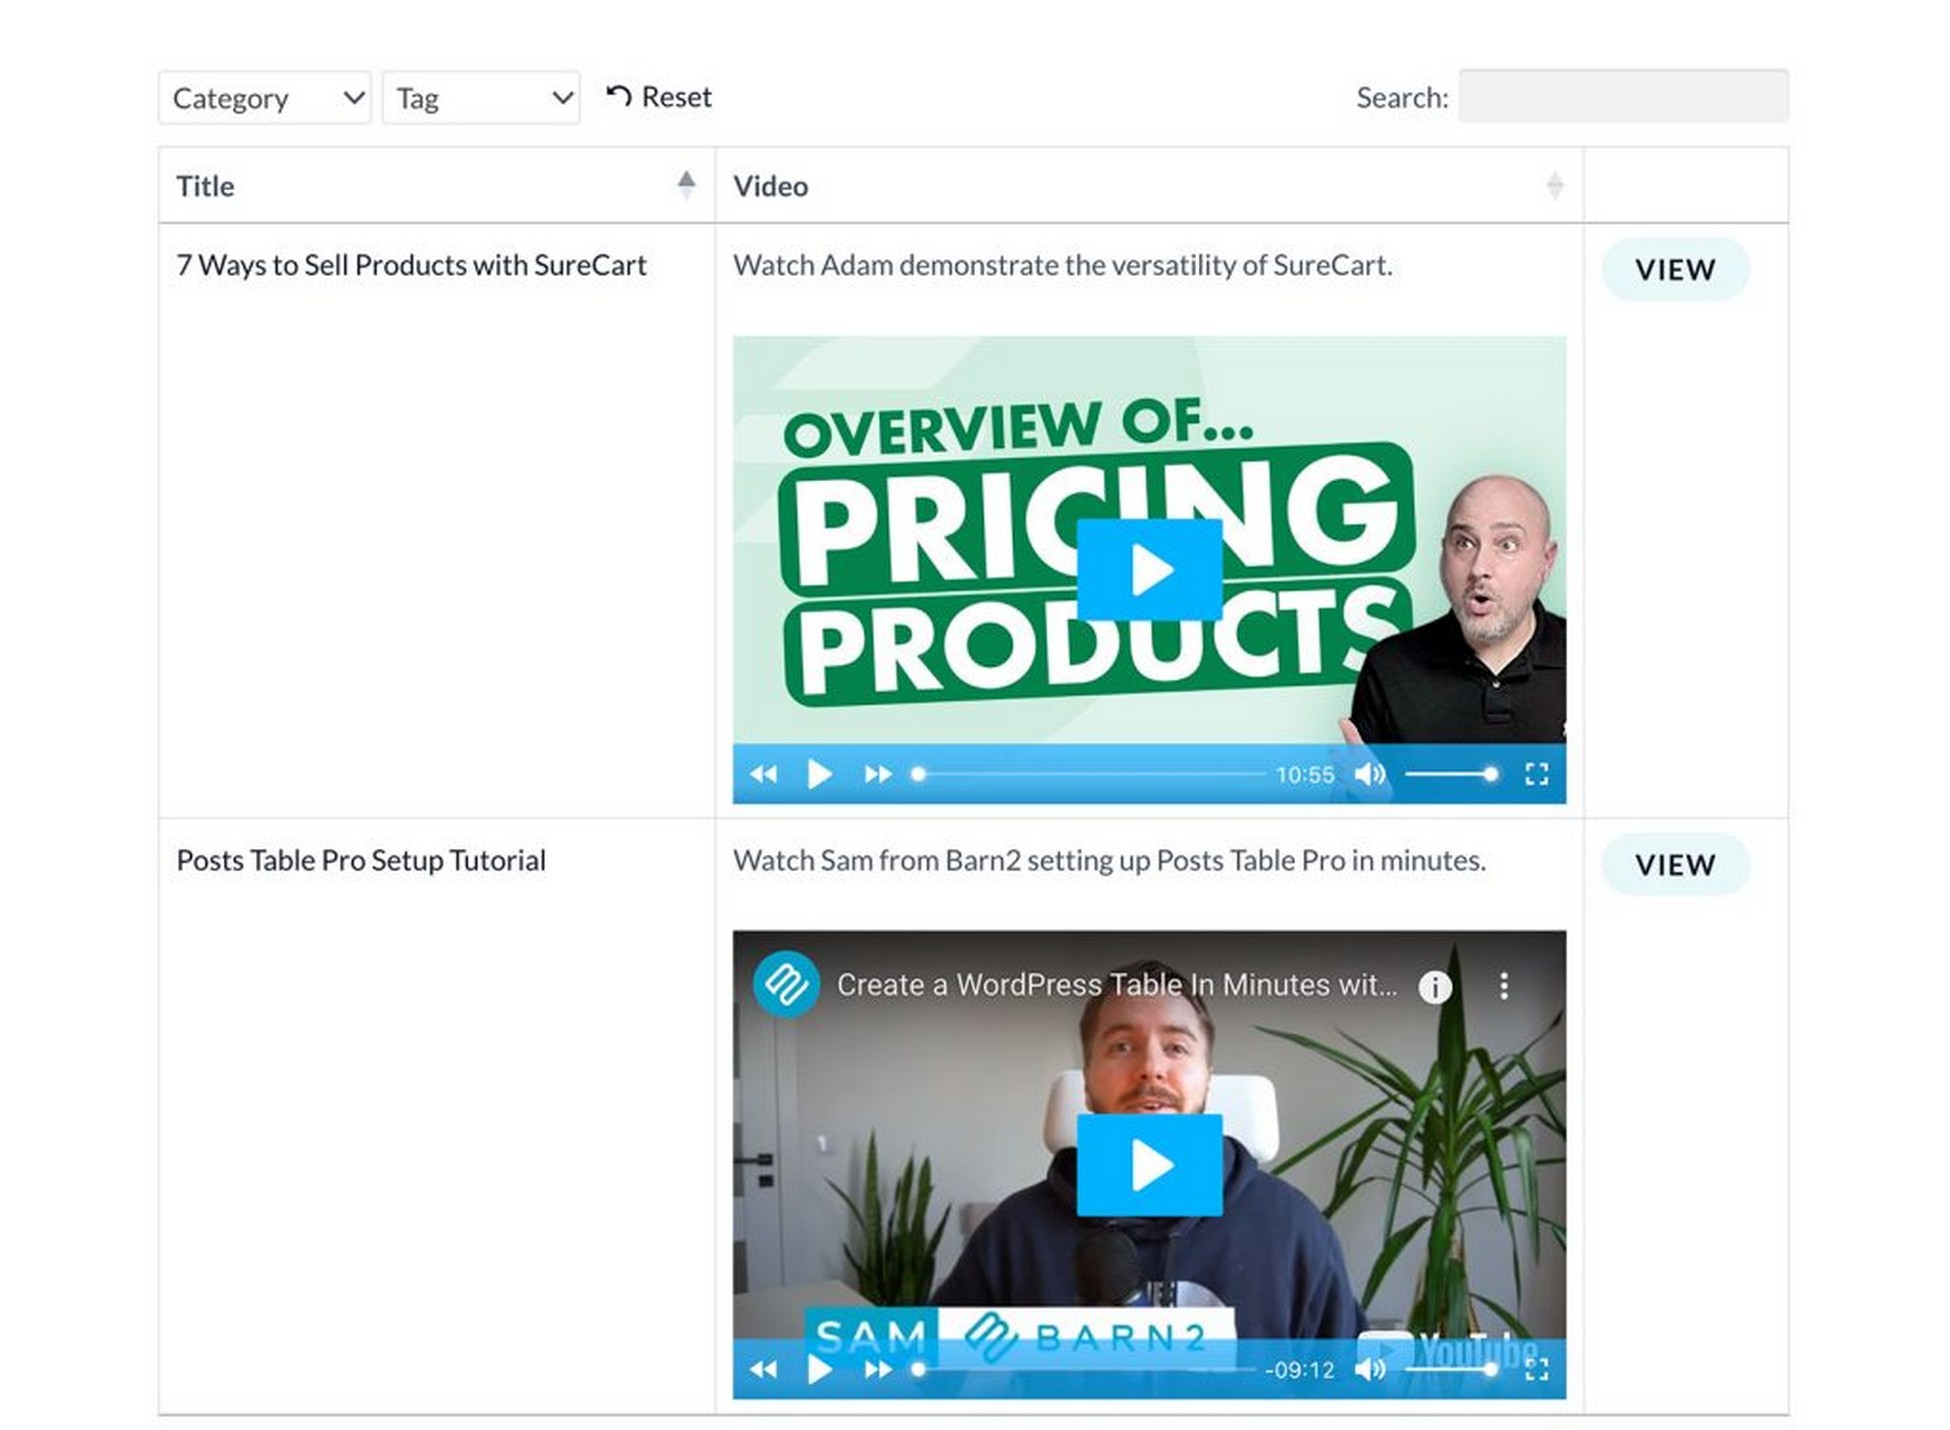
For sites with 3 or more videos on the same page, we recommend using the Posts Table Pro plugin to display them in a searchable WordPress video gallery.
For example, the WordPress site in the below screenshot has used Presto Player to embed the videos and Posts Table Pro to display them in a searchable table.
Customers can filter by category or tag to quickly find the videos they’re looking for.
Posts Table Pro can display any type of content from your WordPress site, including pages or posts and custom post types.
Simply embed YouTube video in WordPress using whichever method you choose, and then use Posts Table Pro to display it in a table.
The Presto Player Advantage
What you saw above is a very basic application of Presto Player in embedding and displaying videos on your web pages.
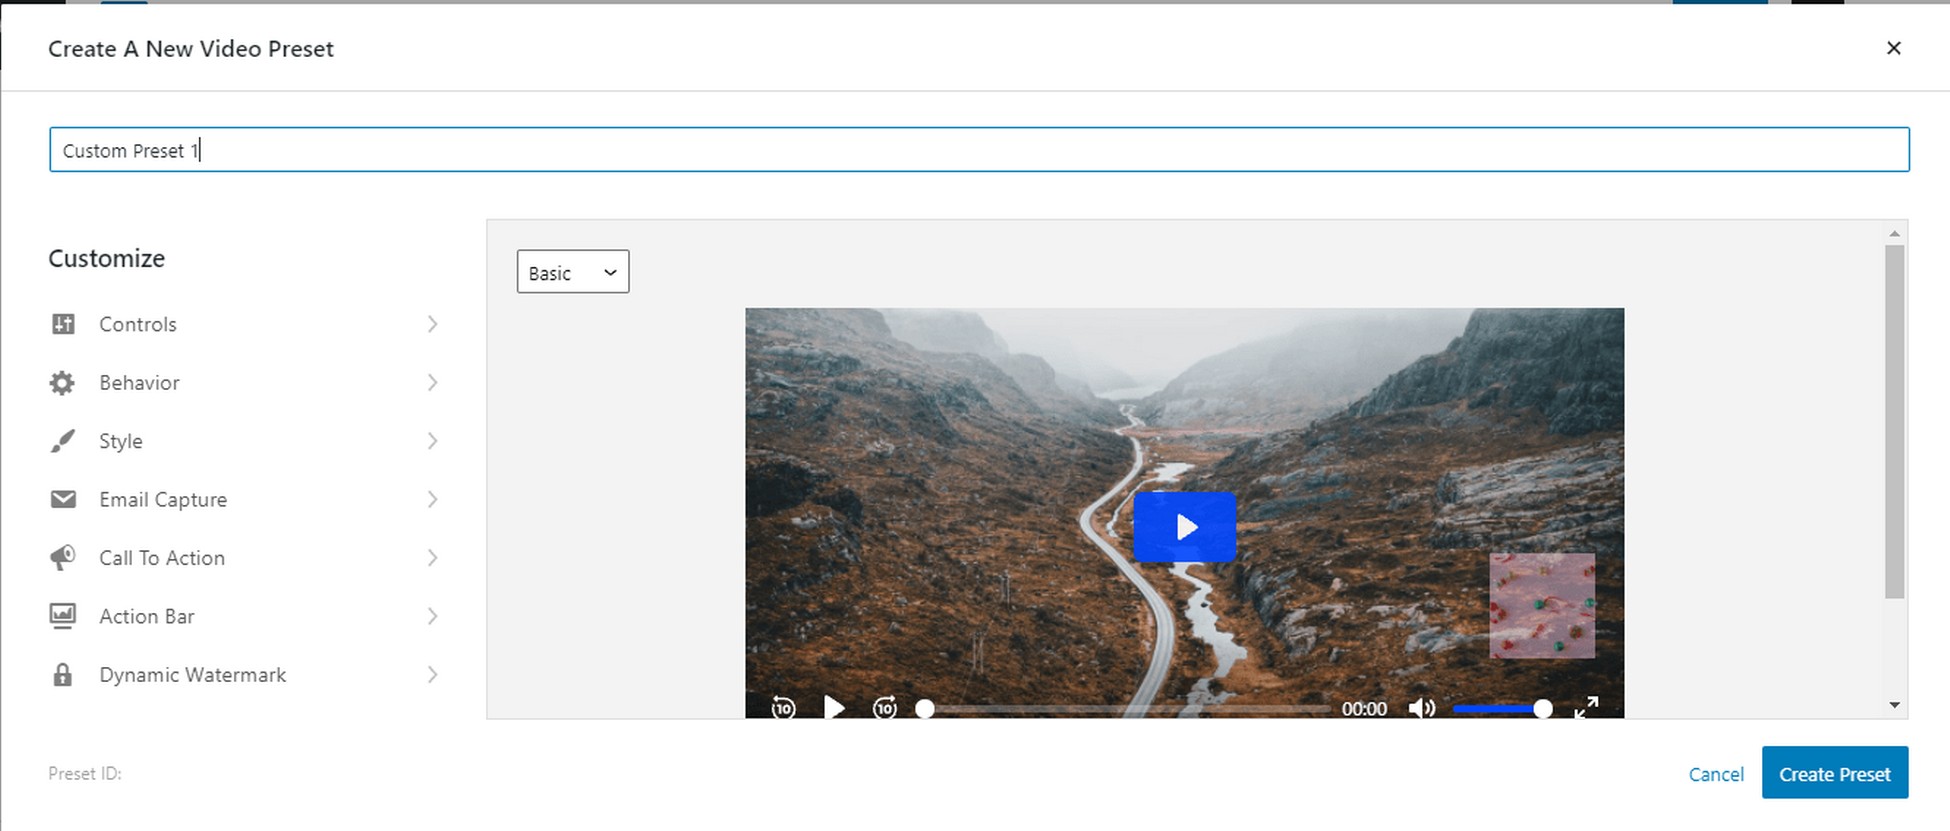
Presto Player goes beyond the simple player embed of the oEmbed method and the basic functionality of the iFrame method. It offers better control over how you can add your branding and logo to the player.
In addition, you can add chapter markers to long videos to help your visitors get to their desired scene quickly.
Similarly, you can also set the options for muted video preview and autoplay using the video autoplay feature to make sure the video can be used in the way you wish.
In addition to adding logos and overlays, you can also define your own preset. This provides a combination of options for placing the Action Bar, email collection, and the placement of playback controls.
Presto Player comes with all the options you need to use videos as advertisements, help desk videos, customer testimonials, sales support videos, and any type of video you choose.
The Temptation to Self-host Videos
At this point, you might be considering the idea of uploading a video directly to the server that hosts your WordPress website.
The idea is certainly tempting – you already have the space, and uploading the videos is a simple matter of using FTP or the WordPress Media Library.
However, using WordPress hosting to upload videos can be limiting. While the idea of self-hosting videos makes sense on paper, it has two critical downsides that you should carefully consider before going ahead.
Self-hosting Takes a Toll on Server Performance
Since the videos are hosted on the same server as your website, every time a visitor lands on a WordPress post with an embedded video, the server has to allocate a portion of server resources (RAM and bandwidth) to cater to the request.
As the number of requests goes up, the overall server response rate drops as more and more server resources are used up by videos.
As a result, your website slows down, and the overall user experience goes down along with it.
To overcome this, you will also need a reliable, cheapest dedicated server to manage the response rate smoothly and protect it within a sustainable data center that ensures its uptime while helping reduce energy usage costs.
Alternatively, using an advanced responsive video embedder can help maintain performance without overwhelming the server.
Little Control Over Advanced Features and Video Playback
When it comes to self-hosted video platforms, your options are limited to the native Gutenberg video block or third-party player plugins for WordPress.
If you opt for the Gutenberg player, you have little control over how the video is played on web pages. This basic player only offers the simplest controls. Also, the player is not optimized for advanced responsive video features and customization.
Instead, adding videos to your WordPress site using video plugins designed to integrate video on WordPress seamlessly can offer more control and features.
For instance, pasting the video URL from platforms like YouTube can enhance the viewing experience without the hassle of server load.
WordPress will automatically handle the YouTube embed, ensuring smooth playback while maintaining server performance.
Conclusion
We went over the three easy methods of embedding videos in WordPress pages and posts.
While the oEmbed method looks the easiest and the iFrame method might appear to offer control over how the video is displayed, you’ll find that using the Presto Player video player plugin offers the best of both worlds – the ease of oEmbed and much more refined control than the iFrame method.
In addition, you get features such as calls-to-action, email gates, dynamic data overlays, and the ability to add custom presets – a fully customizable video embed solution at a fantastic price.
Now it’s your turn!
Mention your favorite method in the comments section and let us know if you have tried Presto Player. We are interested in how it went for you.


